Inserting text into a TextBox

Filed in WPFTags: ,

Recently I wanted to add a newline character to a text box when the user pressed Shift+Enter. The TextBox control in WPF already has a built in AppendText method, however it doesn’t have a built in InsertText method. So I decided to create an extension to add this functionality.

In order to insert text into the text box, I called the Insert method on the text box’s Text property. The text was inserted, but the side affect was that the caret position was moved to the beginning of the text box. So I just moved it back. This is a pretty simple piece of code, so I don’t know why it isn’t included. Here’s the code.

Enjoy!

using System.Windows.Controls;

namespace MyCo.MyApp.Extensions
{
    public static class TextBoxExtensions
    {
        public static void InsertText(this TextBox element, int index, string textToInsert)
        {
            element.Text = element.Text.Insert(index, textToInsert);
            element.CaretIndex = index + 1;
        }
    }
}

UITableViewCell – Remove the border

Filed in iOS

In order to remove the border of a UITableViewCell, set it’s background view to the following:

UITableCiewCell *topCell = [self.tableView cellForRowAtIndexPath: [NSIndexPath indexPathForItem:0 inSection:0]];
topcell.backgroundView = [[UIView alloc] initWithFrame:CGRectZero];

It took me a little while to find this answer, so I thought I’d post it just in case anybody else needed it.

UITableView – Clear Background

Filed in iOS

The other day I wanted to embed a UITableViewController into a UIViewController. The UIViewController had a background image on it, and I wanted the UITableViewController’s view to have a clear background. I tried setting the background color to [UIColor clearColor] and it worked in the storyboard, but at runtime, the background went to it’s default color. I then changed the background color to [UIColor redColor] just to see if it had something to do with clearColor. I ran that and it had the same effect.

Turns out that if you want to set the background color of a UITableView, you must remove the background view in order to see the background color that was set in Interface Builder. Here’s how I did it.

((UITableView*)view).backgroundView = nil;

Rainbow Drill Bit

Filed in Uncategorized

I was about to write a post about the evil spinning rainbow cursor that I’ve come to know and hate over the past few months, when I stumbled upon a post referencing this site:The Marble of Doom Apparently I’m not alone in my hate of this guy. I use Xcode 4.6 on a daily basis and see this time waster at least once per day. Why does it take so long to destroy your app and let you know? Does the camera activate so the Apple guys can watch you cringe? I wish there was a website out there that would show that footage.

Anyhow, I’ll be sure to add my time there from now on. Just like the national debt, it just keeps going up. However, there isn’t a ceiling on this value.

Add your time when you get some time.

Protobuf-objc Installation on Mac OSX Mountain Lion

Filed in iOS

I’ve been doing some research lately into using Google Protocol Buffers on an iOS device. In my initial search for a library and compiler for Objective-C files I found this site. As of this writing, it hadn’t been touched in about 2 years, but I thought I’d give it a try anyhow. After several hours of trying and failing to get the compiler working, I asked Google for another suggestion. That’s when I found this project on Git link

It was still a little dated, almost 6 months since the last edit, but not nearly as bad as the other project. Apparently this project and the other are related since the same installation and usage instructions found on metasyntactic seem to apply to the Booyah Inc. project. It took me awhile to get the compiler up and running, so I thought I’d share the steps I took. Here are the installation instructions that I had to follow to get it working on a MacBook Pro. When I started the process I already had installed Xcode, so the steps begin from there.

Install Xcode Command Line Tools

  1. In Xcode click Xcode > Preferences… > Downloads tab > Command Line Tools Install button

Install Homebrew

  1. Install HomeBrew if you haven’t already by typing the following into a terminal window and following the steps: ruby -e “$(curl -fsSL https://raw.github.com/mxcl/homebrew/go)”
  2. Type brew doctor into the terminal to be sure that HomeBrew will operate correctly. This should be done before installing anything through Homebrew.

Install missing tools needed to install protocol buffers

  1. Open a terminal and type brew install automake
  2. Once that has completed,type brew install libtool

Install Google Protocol Buffers

  1. Download Google Protocol Buffers
    1. NOTE: The current version of protobuf-objc isn’t compatible with Google Protocol Buffers 2.5.0, so you must install 2.4.1.
  2. Unzip the directory and move it to any directory you’d like. I use a directory called /!ThirdParty
  3. Open a Terminal
  4. Navigate to the protocol buffers directory (protobuf-2.5.0)
  5. Type ./configure and press return
  6. Type make and press return
  7. Type make check to see if it installed correctly
  8. Type make install to install the programs

Install Objective C Protocol Buffers compiler (protobuf-objc)

  1. Check out the git project git://github.com/booyah/protobuf-objc.git into your third party code area
  2. In order to configure ProtocolBuffers you need to download and install Google Protocol Buffers
  3. In a Terminal window, navigate to the ProtocolBuffers directory and type ./autogen.sh
  4. Type ./configure and press return
  5. Type make and press return
  6. Type make install and press return

Again, these are just the steps that I took. If you already have the files/programs that I installed using HomeBrew, then you can obviously skip those steps.

I only had to use Homebrew for a few installs, but from that experience I can tell you that it really saved me a lot of time and effort in getting that stuff installed otherwise. I’m coming from a newer Mac user stance on that.

Let me know if I left anything out or if the steps don’t work for you.

Thanks! Matt

Cocos2d – Coordinates

Filed in cocos2dTags:


In the last few weeks I’ve started playing around with the Cocos2d API (Cocos2d iPhone).  As with anything new, you have to learn the basic concepts of it before you can move forward.  One of those basic concepts is the idea of the anchorPoint and ignoreAnchorPointForPosition properties and how they relate with the position of a layer and it’s children.  (ignoreAnchorPointForPosition in 2.0 RC1 was isRelativeAnchorPoint in 0.99 reference) After some frustrations, I finally was able to solidify my mental model of how they interact and I wanted to illustrate it so others could understand as well.  If you’ve been using Cocos2d for a long time, then this will probably bore you.  Anyhow, here wego!

Looking at the basic concepts described in the Cocos2d Programming Guide (link), a scene is a class that can contain multiple layers, which can in turn contain sprites.  All of which derive from CCNode.  By default, the scene is the same size as the view that it is in, its position is (0, 0), its anchorPoint is (0, 0) and ignoreAnchorPointForPosition is set to false, all of which are inherited from CCNode.  Typically you don’t want to change that.  Onto the layers.

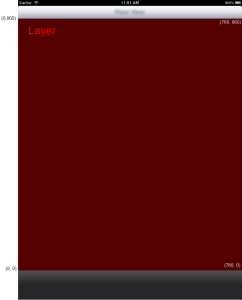
Each layer, or other CCNode, that is added to the scene has its own position, anchorpoint and ignoreAnchorPointForPosition, which determine it’s location within the scene.  The position coordinates are relative coordinates and they are relative to their parent CCNode.  So the default layer has its position as (0, 0), anchorPoint as (0.5, 0.5) and ignoreAnchorPointForPosition set to true.  With these settings, the layer will look like the following.
cocos2d coordinates default layout

In the screenshot, the view which cocos2d resides in is 768 pixels by 860 pixels.  The background is black and the layer is illustrated with a semi-transparent square and a “Layer” label.  This all changes though when ignoreAnchorPointForPosition is changed to false for the layer.  Instead of being laid out like the above picture, it’s laid out like the next.
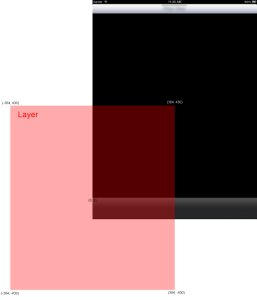
It’s laid out like this because the layer is now taking into account it’s anchorPoint.  When the anchorPoint is (0.5, 0.5), the node’s area is laid out with its position considered to be it’s center.  If we had set the anchorPoint to (0, 0) then the layer would still have been laid out like the previous image.  This positioning logic is applied to every node.    Take for example the following scenario.

Scene: Default values

Layer: AnchorPoint = (0.5, 0.5), Position = (0, 0), ignoreAnchorPointForPosition = false.

Sprite: AnchorPoint = (0.5, 0.5), Position = (768, 860), Size = (800, 600), ignoreAnchorPointForPosition = false

Your screen would look like this (the layer is just added to show where it’s at.  You could also just use a CCLayerColor to show were it’s at as well):
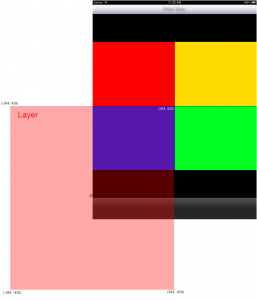
As you can see, the layer is obeying its anchorPoint by placing it’s center at (0, 0) instead of it’s bottom left corner at (0, 0).  The sprite is also obeying its anchorPoint.  It’s position is (768, 860), but that’s relative to its parents position.  So the center of the sprite is 768 points from the left side of the layer and 860 points from the layer’s bottom.  It is centered on its position because of its anchorPoint, which is (0.5, 0.5).

So hopefully this all makes sense and everybody who reads this post will understand this sometimes confusing subject.

WordPress upgrade to 3.4

Filed in Matt's PostsTags: ,

Upgrades should be a time to rejoice.  A time to celebrate new features like gifts at Christmas.  However, the WordPress upgrades are never that smooth.  Now I’m not bashing WordPress software.  Once it is upgraded, it is wonderful, but the feelings leading up to an upgrade can be described as nausea, fear, anger and sadness.  These feelings were again justified when I upgraded (or attempted) to 3.4.  I’m still in the process right now and I’m betting this post won’t survive the rest of the upgrade.  If I ever figure this out, I’ll make a ton on Freelancer.com and then post the solution here after I’m a millionaire.

Alright, alright so I was wrong.  The post made it and the fix ended up being simpler than I thought it would be.  I posted a question on the WordPress support forum here and the moderator’s fix worked.  I had to copy the wp-settings.php file over, which wasn’t part of the upgrade process listed here.  The site is back up and we’re back in business.

Mac OS X keyboard symbols and shortcuts

Filed in Mac, UncategorizedTags: , ,

I’ve been tasked with creating a new program to go onto the Apple Store.  I’ve never been a Mac user and probably never will be, but since I have to use it for now, it’s really helpful to know how to get around on one.  In order to do things faster, I try to keep from going back and forth between the keyboard and the mouse.  However if I want to do that, I need to know all the keyboard commands that I normally use on a Microsoft Windows computer.  The first confusing thing that I ran into was the funny symbols the Mac OS uses to define special keys.  The most notable ones are the control, option and command symbols.  Now on the MacBook Pro that I’m currently using, the command symbol is on the command key, so it’s easy to see that the symbol goes with that key.  However, the option symbol and the control symbol are not on their respective keys so I had to ask Google about them.  A quick search led me to Ted Wise’s page: http://tedwise.com/2009/04/28/what-do-those-weird-mac-symbols-mean/, which was very helpful.

When I found out what the symbols meant, I was able to come up with the following table of the shortcut keys that help me navigate and use Xcode 4 quickly.  I know there are a lot of pages out there that list shortcut keys, but they seem to be huge and also list a ton that I’ll never use.  This list is meant to be a sub-set of those that I use on a daily basis.  The list might be small for now, but I’ll be sure to add other helpful ones in the future.

Shortcut Description
⌘ + / Comment or uncomment section
⌘ + C Copy
⌃ + I Correct selection indentation
fn + Delete Delete text that is ahead of the cursor
⌃ + A + K + K Delete entire line
⌘ + → End
⌘ + F Find
+ + ⌘ + ← Fold methods and functions
⌘ + + Esc Force close an application
⌘ + ← Home
⌘ + ] Indent the selected text
⌘ + V Paste
⌘ + Z Undo
+ + ⌘ + → Unfold methods and functions

Last edited: June 28, 2012

KeePass – A great password security app

Filed in Helpful SoftwareTags:

I had some time the other day and decided to try to solve my password problem.  I wanted an application that could store all of my passwords easily and securely and also for free.  I Googled around a little bit and came across exactly what I needed.  The program is called KeePass.  The idea is that it stores all of your passwords in a small, very well encrypted database that is very portable.  The first question that came to mind was how easy would it be for a hacker to get all of my passwords.  According to the guys at JLog (link) the database itself could not be more safe.  The only weakness in the whole system is the master password, which is only weak if the user is weak in keeping it safe.

Anyhow, it looks like KeePass is awesome and, until I find something better, is what I’ll use.  Click on the image below to check out their website.

KeePass

WordPress database error Table '27178_beckerswebsite.wp_formbuilder_pages' doesn't exist for query SELECT * FROM wp_formbuilder_pages made by require('E:\inetpub\vhosts\beckerwebsite.com\httpdocs\wp-blog-header.php'), require_once('E:\inetpub\vhosts\beckerwebsite.com\httpdocs\wp-includes\template-loader.php'), do_action('template_redirect'), call_user_func_array, formbuilder_init, fb_is_active